How to Build a Dragon
How We 3D Printed a Life-Size Toothless
How do you build a dragon?
For us, the answer involved 180–250 kg of filament, some very large 3D printers, a custom steel skeleton, plastic welding, metal bumper staples, conduit, faux crocodile leather, a crash course in sewing, a lot of paint and one strategically hidden Sonos speaker.
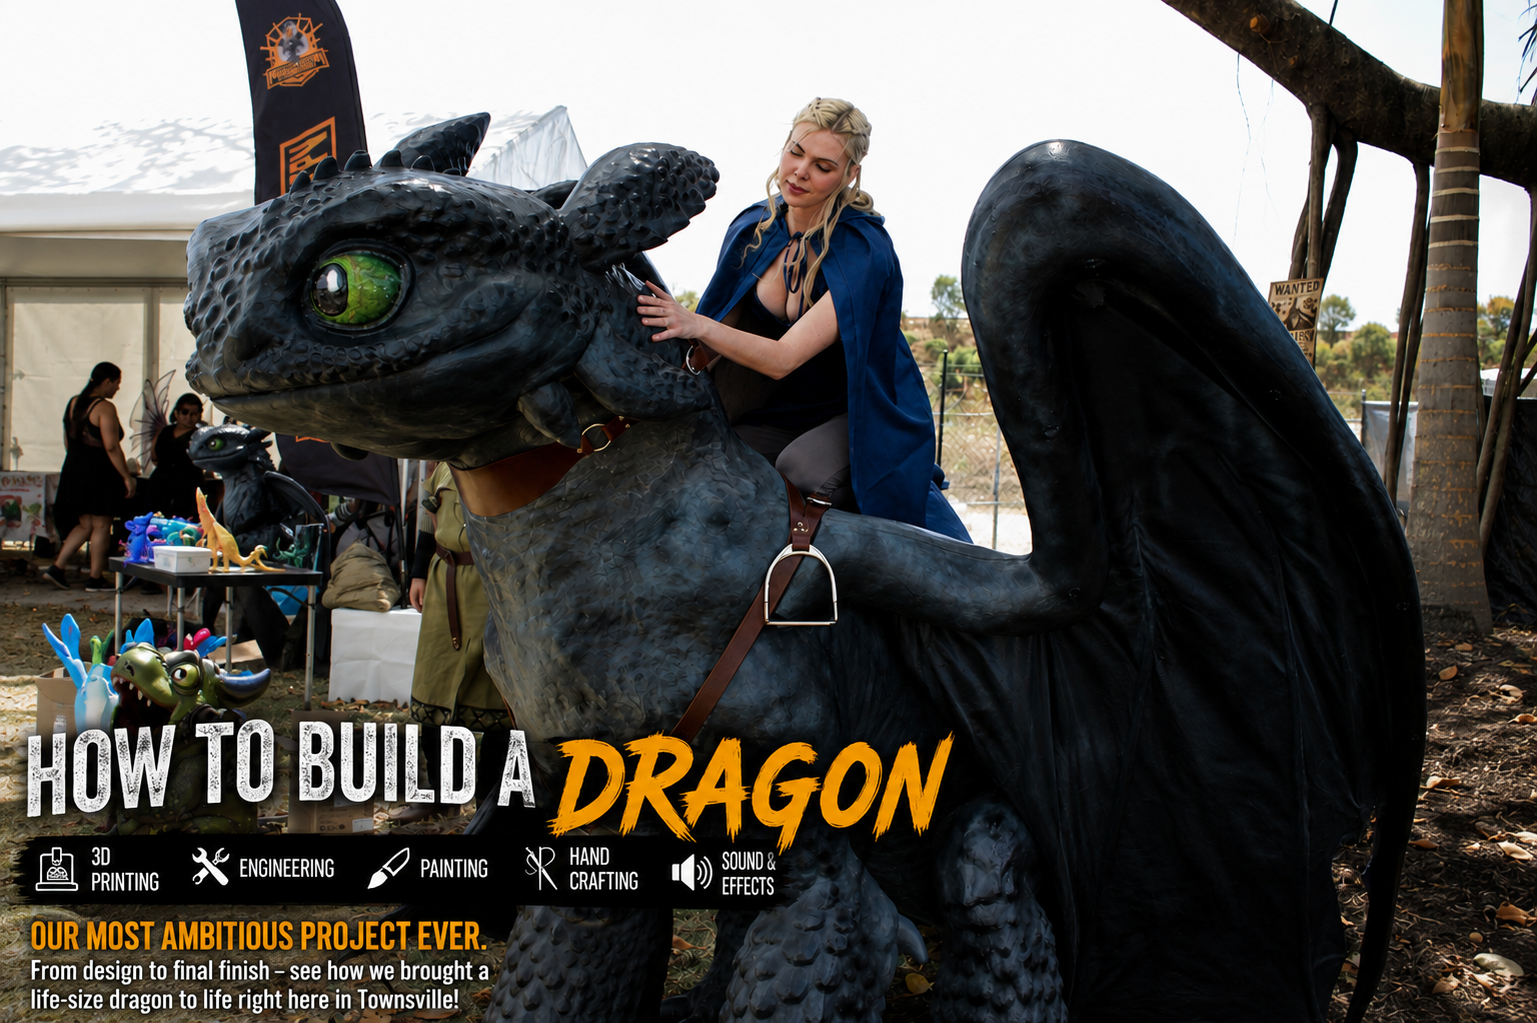
What started as another one of our slightly crazy ideas became one of the biggest projects we've ever undertaken at Rising Sun FPV: building a 1:1 scale Toothless for the Townsville Medieval & Fantasy Festival.
And when we say life-size, we mean it.
We wanted to create something people could walk around, photograph, interact with and even climb onto the saddle.
That meant we weren't just making a giant 3D print.
We were building a dragon.

Day 1 – 30 May 2026
Printing officially started on 30 May 2026.
At this point, Toothless existed as a collection of digital files and an increasingly questionable plan to turn them into a full-size dragon.
The first major challenge was scale.
A model designed to look good on a screen or as a smaller print behaves very differently when it's enlarged to life size. Every wall, connection and component suddenly becomes an engineering consideration.
We also had to work within the build volumes of our printers.
Fortunately, this is exactly the sort of project our Modix Big Meter and Modix Big 60 printers were made for.
Even with machines this large, however, Toothless still had to be divided into a huge number of individual components.

And then the printers started running.
180–250 kg of Filament
It didn't take long for the scale of the project to become obvious.
By June, large yellow and purple sections of dragon were appearing throughout the workshop.
A head here.

A leg there.

Half a body sitting on the floor.

Customers coming into the shop got to watch Toothless slowly grow over the following weeks.
By the end of the project, we estimate that approximately 180–250 kg of filament went into the build.
That's the equivalent of roughly 180 to 250 standard 1 kg rolls of filament. Well actually that's the painful part... it was. We only had single kg spools available at the time.
And when a print this large fails, you're not throwing away a few grams of plastic.
Some components took days to produce, so a failure could mean losing a significant amount of material and several days of machine time.
There were failures. (1 due to a blackout)
There were reprints. (Zak walking away during the first layer and not baby stepping)
There was plenty of problem solving.
There isn't exactly a manual for this sort of thing.

Building the Dragon's Skeleton
One of the most important parts of Toothless is also something you'll barely see in the finished photos.
His skeleton.
We knew from the beginning that the printed plastic alone couldn't be responsible for carrying all of the loads.
People were going to sit on him.

The wings were going to be enormous.
He needed to survive transportation, assembly, disassembly and being around thousands of people.
So we brought in Bushstone Engineering to help fabricate a custom internal metal frame.

The frame runs through the body and creates the structural backbone of the entire build.
Instead of someone's weight being supported by a giant plastic shell, the load can be transferred through the internal structure.

It also gave us strong mounting locations for the wings and saddle.
This was the point where the project stopped being simply "large-format 3D printing" and started becoming a combination of 3D printing, fabrication and engineering.

Stitching a Dragon Together
With dozens of huge printed components, joining Toothless together presented another problem.
We didn't want to rely on glue alone.
Instead, we used three different methods together:
PLA Acrylbond + metal bumper staples + plastic welding.
The printed sections were first aligned and bonded using the PLA Acrylbond that we sell in-store at Rising Sun FPV.
Once everything was correctly positioned, we reinforced the seams with heated metal bumper repair staples.
The staples are melted directly into the plastic across the joint, essentially stitching the two printed pieces together from the inside.
Then came plastic welding.
Compatible plastic was melted into and across the seams, permanently fusing the sections together and adding even more strength.
So each major joint wasn't relying on one method.
The Acrylbond held and bonded it.
The metal staples mechanically reinforced it.
And the plastic welding fused it together.


When you're building something that's going to be handled by the public, we'd much rather overbuild it than discover later that we should have.
Fibreglass Reinforcement – Adding Strength Where It Mattered
Even with the Acrylbond, metal bumper staples and plastic welding, there were areas of Toothless where we wanted additional reinforcement.
For those areas, Scott from S3DP came in and helped us reinforce key sections of the dragon with fibreglass.
The fibreglass was applied internally in areas that were going to experience higher loads or where we wanted additional strength across the joins. This created another layer of reinforcement without affecting the finished appearance of the dragon.
By this stage, Toothless was becoming a combination of several different structural systems rather than simply being a large hollow 3D print.
The custom steel frame from Bushstone Engineering formed the main structural skeleton.
The PLA Acrylbond, metal bumper staples and plastic welding joined the individual printed sections together.
And S3DP's fibreglass reinforcement strengthened critical areas of the printed shell.
It was another example of something we learnt repeatedly throughout this project: just because you can 3D print something doesn't mean every part of the solution should rely entirely on 3D printing.
For a build this large, using the right material and process in the right place was far more important.

A massive thank you to Scott from S3DP for getting involved and helping us make sure the dragon was properly reinforced where it mattered.
The First Time He Stood Up
By early July, things started getting exciting.
For weeks we'd been looking at individual sections and partially assembled pieces.

Then Toothless finally started looking like Toothless.


Seeing the dragon standing in the workshop for the first time gave us a completely different appreciation for the scale of what we'd built.
Photos don't quite communicate it.
He's big.
Really big.
And at this stage he was still bright yellow and purple, covered in visible print lines and nowhere near finished.
But there was finally a dragon standing in the shop.


Making 3D Printing Disappear
Printing Toothless was only half the battle.
If we'd simply painted the raw prints black, he would have looked like exactly what he was:
A gigantic 3D print.
We wanted the finished piece to look like a dragon.
That meant making the manufacturing process disappear as much as possible.
Every major joint needed filling.
Layer lines needed reducing.
Plastic welds needed cleaning up.
Surfaces needed sanding.
Then filling again.
Then sanding again.
Then priming.
Then finding all the bits we'd missed.
Then sanding again.

There is no magic button for this part.
Large-format 3D printing can produce enormous objects, but if you want a display-quality finish, there is still a huge amount of traditional hands-on work involved afterwards.


From Yellow Dragon to Night Fury
Then came one of the most satisfying moments of the project.
Black paint.


Almost immediately, everything changed.
The random yellow and purple printed sections disappeared and the different components suddenly looked like one continuous creature.
But Toothless isn't simply flat black.
Zak and Jaz handled the painting, building up different blacks, greys, highlights and surface variation to bring out the sculpted scales and details.

Paint and supplies came from Townsville Wholesale Paints, who also helped us out with an awesome deal on a compressor for the project.

The highlights became particularly important.
Without them, all of that detail we'd spent weeks printing and finishing would disappear into a black silhouette.
With them, the scales, face, legs and body started catching the light.
He was finally becoming Toothless.
How Do You Build Dragon Wings?
The wings created an entirely different engineering problem.
Fully 3D printing them would have made them unnecessarily heavy, difficult to transport and placed a huge amount of additional load on the structure.
So we built them differently.
The main wing supports used metal poles connected to the internal structure, with the large detailed 3D-printed wing components bolting onto them.
For the lighter internal wing "bones", we used conduit.


This created the shape we needed without adding a ridiculous amount of weight.
Then we needed skin.
For that we chose black faux leather embossed with a crocodile pattern.
Up close, the crocodile texture gave the wings a reptilian appearance while still allowing us to create huge flexible membranes between the wing bones.
There was only one minor issue.
Zak didn't know how to sew.
So Zak learnt to sew.
Because apparently that's another skill required for 3D printing a dragon.
The material was measured, cut and stitched so it could wrap around the conduit and structural supports.

The result was a hybrid construction:
3D printing for detail.
Steel for major structural loads.
Conduit for lightweight wing bones.
Hand-stitched faux crocodile leather for the wing membranes.
It also kept the wings removable.
The large printed sections bolt onto the metal poles, meaning Toothless can be partially disassembled when we need to transport him.
Because building a life-size dragon is one problem.
Getting one through a doorway is another.

Those Eyes
And then we added the eyes.

This might have been one of the biggest transformations of the entire build.
You can build the body.
You can build the wings.
You can paint every scale.
But the eyes are what give the character life.
The bright green eyes immediately became the focal point of the finished head.
Once they went in, it stopped feeling like we were looking at a model.
It felt like he was looking back.
Once the painting was completed we then used UV rersinand a 2k clear coat to bring them more to life.

The Most Important Print Wasn't the Biggest One
With 150–180 kg of filament going into Toothless, you'd probably assume the most important print of the entire project was one of the enormous body sections coming off the Modix.
It wasn't.
One of the most useful things we printed was actually one of the smallest.
Before we got too far into some of the finer details, we printed a complete 1:10 scale Toothless.
Having a physical miniature of the finished dragon gave us something we simply couldn't get from looking at the model on a computer screen.
We could pick it up, turn it around, look at the proportions and use it as a physical reference for how different parts of the full-size build needed to come together.
More importantly, we could hand it to other people working on the project.
And that's exactly what we did with ATD Crafting.
ATD was responsible for creating Toothless' full-size handcrafted leather saddle, so rather than giving him a collection of measurements and reference images, we gave him the actual dragon.
Just ten times smaller.
He could physically see where the saddle needed to sit, how it interacted with Toothless' back and how large different elements needed to be in relation to the rest of the dragon.
ATD even produced a miniature leather saddle for the 1:10 model as part of working out the design.


And it wasn't just a rough piece of leather thrown over the model.
It was a tiny handcrafted saddle, complete with the shaping, stitching and details that would eventually be translated into the full-size version.
This little dragon became a surprisingly important bridge between digital design, 3D printing and traditional craftsmanship.
Once everyone was happy with how things looked at 1:10 scale, it was time to make it considerably bigger.
A lot bigger.
Every Dragon Needs a Saddle
With the design worked out on our miniature Toothless, ATD Crafting could begin turning that tiny saddle into the real thing.
The full-size saddle was handcrafted using leather we purchased from Lanskey's, with ATD creating the straps, stitching, hardware and detailing that transformed the design we'd tested at 1:10 scale into something people could actually sit on.
The saddle and Toothless' tail fin were handcrafted by ATD Crafting, using leather we purchased from Lanskey's.


This was another part of the project where using a completely different manufacturing technique produced a much better result than trying to 3D print everything.
Real leather gave the saddle the texture, movement and appearance we wanted and contrasted beautifully with the painted body.
The internal steel structure underneath meant the saddle wasn't simply sitting on top of a plastic dragon either.

It was part of a structure designed from the beginning to allow people to actually climb aboard.

Building Toothless' Tail Fin
One of Toothless' most recognisable features is his prosthetic tail fin, so this was another part of the build that we didn't want to simply 3D print and call finished.
We handed this part of the project over to ATD Crafting, who built the tail fin completely by hand.
This wasn't just leather stretched over a printed part either.
ATD fabricated and welded the internal structure of the tail fin from scratch, creating a strong framework that could then be fitted to the end of our enormous 3D-printed tail.


From there, he handcrafted the rest of the fin, working the leather around the fabricated frame and adding the details needed to recreate the distinctive handmade appearance of Toothless' prosthetic fin.


It was another perfect example of why we didn't try to manufacture every component of Toothless using the same process.
The dragon's tail itself was produced using large-format 3D printing, but when it reached the very end, the manufacturing process changed completely.
3D printing became metal fabrication.
Metal fabrication became welding.
Welding became traditional leatherwork.
And eventually it became Toothless' tail fin.

The finished piece looked like it belonged on the dragon rather than something we'd simply printed and attached afterwards.
Between the fully handcrafted saddle and the welded and hand-finished tail fin, ATD Crafting's work added an entirely different kind of craftsmanship to the project and helped us nail some of the details that make Toothless instantly recognisable.
It's also a great example of what this entire build became.
We started out thinking we were going to 3D print a dragon.
By the end, we were 3D printing, plastic welding, fibreglassing, steel fabricating, painting, sewing, welding and leatherworking our way to a finished Toothless.
Apparently that's how you build a dragon.
Of Course We Made Him Roar
At some point during the build somebody had the completely reasonable thought:
If we're building a life-size Toothless, he should make noise.
So we hid a Sonos speaker inside him.
Toothless could roar.
But our favourite was making him purr like an enormous cat.
After spending months engineering, printing and painting him, hearing a giant Toothless purring at people seemed like the appropriate finishing touch.
The Final Assembly
By August, the yellow and purple collection of prints we'd started with was almost unrecognisable.

The body was finished.
The wings were fitted.
The eyes were installed.
The saddle was on.
The tail fin was complete.
The sound system worked.
After starting the first prints on 30 May 2026, we finally had our dragon.
Then we had to take him apart again.
Because we still needed to get him to the festival.
Taking a Dragon to Townsville Medieval & Fantasy Festival
Transportability had been considered throughout the design, but moving something this large is never exactly straightforward.
Major components, particularly the wings, could be removed for transport and then bolted back onto the internal structure once Toothless reached the site.
Then came the moment we'd been working towards.
Toothless was assembled at the Townsville Medieval & Fantasy Festival.

And suddenly the months of work made sense.
People could walk right up to him.
Kids could sit on him.
Families took photos.
People touched the wings and looked closely at the scales and eyes.
And throughout the day, this enormous 3D-printed dragon was surrounded by people.


Billiebug Cosplay dressed as deanery's in front of Toothless

Billiebug Cosplay dressed as deanery's ridding Toothless
Those photos probably demonstrate the scale of the project better than any measurement ever could.


Every Toothless Needs a Hiccup
Of course, there's one thing you can't have a Toothless without.
Hiccup.
Fortunately, we had that covered too.
Zak's son Odin became our very own Hiccup and, more importantly, one of the first people tasked with testing whether all of our work actually did what we intended it to do.
After months of printing, welding, fibreglassing, painting and building a custom saddle, somebody eventually had to climb aboard.

Having Odin sitting in the saddle also gave us one of the best demonstrations of just how big Toothless actually was.
Throughout the build we'd become accustomed to having giant dragon parts scattered around the workshop. After a while, a metre-long printed section sitting on a bench starts to seem strangely normal.
Put a kid on his back, though, and suddenly the scale becomes obvious again.
It was also a pretty special moment for the project.
We'd started printing Toothless on 30 May 2026 as a collection of enormous pieces coming off the Modix printers.
Now we had a finished dragon, a handcrafted saddle...
and our own little Hiccup ready to ride him.

Not a bad way to test a 3D print.
So, How Do You Build a Dragon?
Apparently, you need:
180–250 kg of filament.
A couple of very large 3D printers.
A steel skeleton.
A lot of Acrylbond.
Metal bumper staples.
Plastic welding.
Conduit.
Several metres of fake crocodile leather.
Someone willing to suddenly learn how to sew.
A handmade leather saddle.
A compressor.
A lot of paint.
A Sonos speaker.
And a workshop full of people willing to look at a completely unreasonable idea and say:
"Yeah, we can probably build that."
More Than a 3D Print
Toothless is one of our favourite examples of what modern additive manufacturing can actually do.
3D printing was at the centre of the project, but 3D printing alone didn't build him.
This project brought together additive manufacturing, CAD, fabrication, traditional finishing, painting, leatherwork, sewing, electronics and engineering.
That's something we strongly believe in at Rising Sun FPV.
A 3D printer is a tool.
Sometimes the best solution isn't to print everything.
Sometimes it's a steel frame.
Sometimes it's a piece of conduit.
Sometimes it's leather.
Sometimes you have to pick up a sewing machine and learn a completely new skill because you've somehow found yourself making wings for a dragon.
The important part is figuring out how all of those processes can work together to turn an idea into something real.
The People Who Helped Us Build a Dragon
A project like this doesn't happen without help, and Toothless brought together a number of talented local businesses and people who each contributed something different to the build.
A massive thank you to Bushstone Engineering for fabricating the custom internal metal structure that gave Toothless his skeleton. This frame formed the structural backbone of the entire dragon, supported the saddle and provided the mounting structure for those enormous wings.
A huge thank you to Scott from S3DP, who came in and helped us reinforce key areas of Toothless with fibreglass. Combined with our plastic welding, metal bumper staples and Acrylbond, the fibreglass gave critical areas of the printed shell additional strength and helped make sure Toothless was ready for the punishment that comes with transport, assembly and thousands of people interacting with him.
A very special thank you goes to ATD Crafting for creating two of the most important finishing pieces on Toothless: his handcrafted leather saddle and his iconic tail fin.
The saddle wasn't simply a decorative piece added at the end. It needed to work around the structure we'd built underneath, be suitable for people to sit on and, most importantly, look like it genuinely belonged on Toothless.
ATD Crafting took the leather he purchased from Lanskey's and turned it into the finished saddle, complete with the straps, hardware and details that helped transform Toothless from a giant model into something that looked ready to be ridden.
He also handcrafted Toothless' tail fin, recreating one of the character's most recognisable features. It might be a relatively small part compared with the enormous body and wings, but visually it was incredibly important. Getting that detail right helped complete the character and tie the entire build together.
The leatherwork brought a completely different style of craftsmanship to a project otherwise dominated by 3D printing, steel fabrication, fibreglass and painting. That's one of our favourite things about this project — there wasn't one manufacturing process that could do everything, so we brought together people with completely different skills to make it work.
We've been big supporters of ATD Crafting, and we're proud to stock a selection of his handmade products right here at Rising Sun FPV. If you're visiting the store, make sure you have a look at his work while you're here as well. Supporting talented local makers and finding ways to combine their skills with what we do is a big part of projects like this.
Thank you to Townsville Wholesale Paints for supplying the paint and finishing materials used to bring Toothless to life, as well as helping us out with an awesome deal on the compressor used throughout the painting process. With something the size of Toothless, there was a lot of surface area to cover, and having the right equipment and paint made a massive difference to the final result.
And, of course, thank you to the Townsville Medieval & Fantasy Festival for giving us a very good reason to spend nearly three months filling our workshop with dragon parts.
Toothless might have started on a 3D printer, but the finished dragon was the result of 3D printing, steel fabrication, fibreglassing, plastic welding, painting, leatherwork, sewing and a lot of people contributing their own skills to one slightly ridiculous idea.
That's ultimately what made this project so much fun to build.
It wasn't just a 3D printing project.
It was a Townsville project, built with the help of some incredibly talented local people and businesses.
What's Next?
Toothless is one of the most ambitious projects we've ever completed.
But projects like this are exactly why we do what we do.
Someone comes to us with an idea.
Sometimes it's practical.
Sometimes it's complicated.
And sometimes it's:
"Can we build a life-size dragon?"
Our answer tends to be the same.
Let's figure out how.
If you've got an ambitious project of your own — a life-size character, mascot, movie prop, museum piece, commercial display, cosplay build, engineering prototype or something nobody quite knows how to manufacture yet — talk to the team at Rising Sun FPV.
We don't just print parts.
You dream it. We make it.
Showcase of the event